Copado Agentia
    Agentia Academy · Enablement for CICD Developers

    Training
    for CICD developers.

    A step-by-step path for Copado CI/CD users who build Salesforce changes in their local IDE and want Agentia Headless as their main way to work with Copado CI/CD and Copado Robotic Testing.

    Source Format pipelines only. Commits, jobs, promotions, conflict resolution, deployments, data operations, metadata and dependency commands work with Copado CI/CD Source Format pipelines. Metadata Format pipelines are not supported.

    Knowledge required before the training

    • SF Dev Tools: hands-on experience with VS Code, Salesforce CLI, extensions, and Git (pull, commit, push, branch management) to retrieve, edit, and deploy metadata to sandboxes.
    • Copado CI/CD: connecting dev environments to pipelines; creating user stories, setting core fields, and committing metadata; promoting, deploying, and back-promoting changes; reviewing quality gates and resolving merge conflicts.
    • Agentic development: using Cursor, Claude Code, Codex or similar to build Salesforce or other changes by prompting in an IDE.
    Module 1

    What is Agentia Headless

    Agentia Headless brings Copado CI/CD, Copado Robotic Testing, and Copado AI into one CLI (agentia), an IDE extension, a local MCP server, and Agentia Skills. You run the same delivery operations from the terminal, from VS Code or Cursor, or through your coding agent, while Copado stays the system of record for every story, promotion, and deployment.

    Module 2

    Why it matters for Salesforce developers

    For CICD users it removes the switch between the IDE and the browser: select your story, commit, run quality gates locally, validate, and deploy to the next environment from where you write code. Quality gates run before you submit, so problems show up earlier, and coding agents follow the same governed Copado flow instead of improvising.

    Module 3

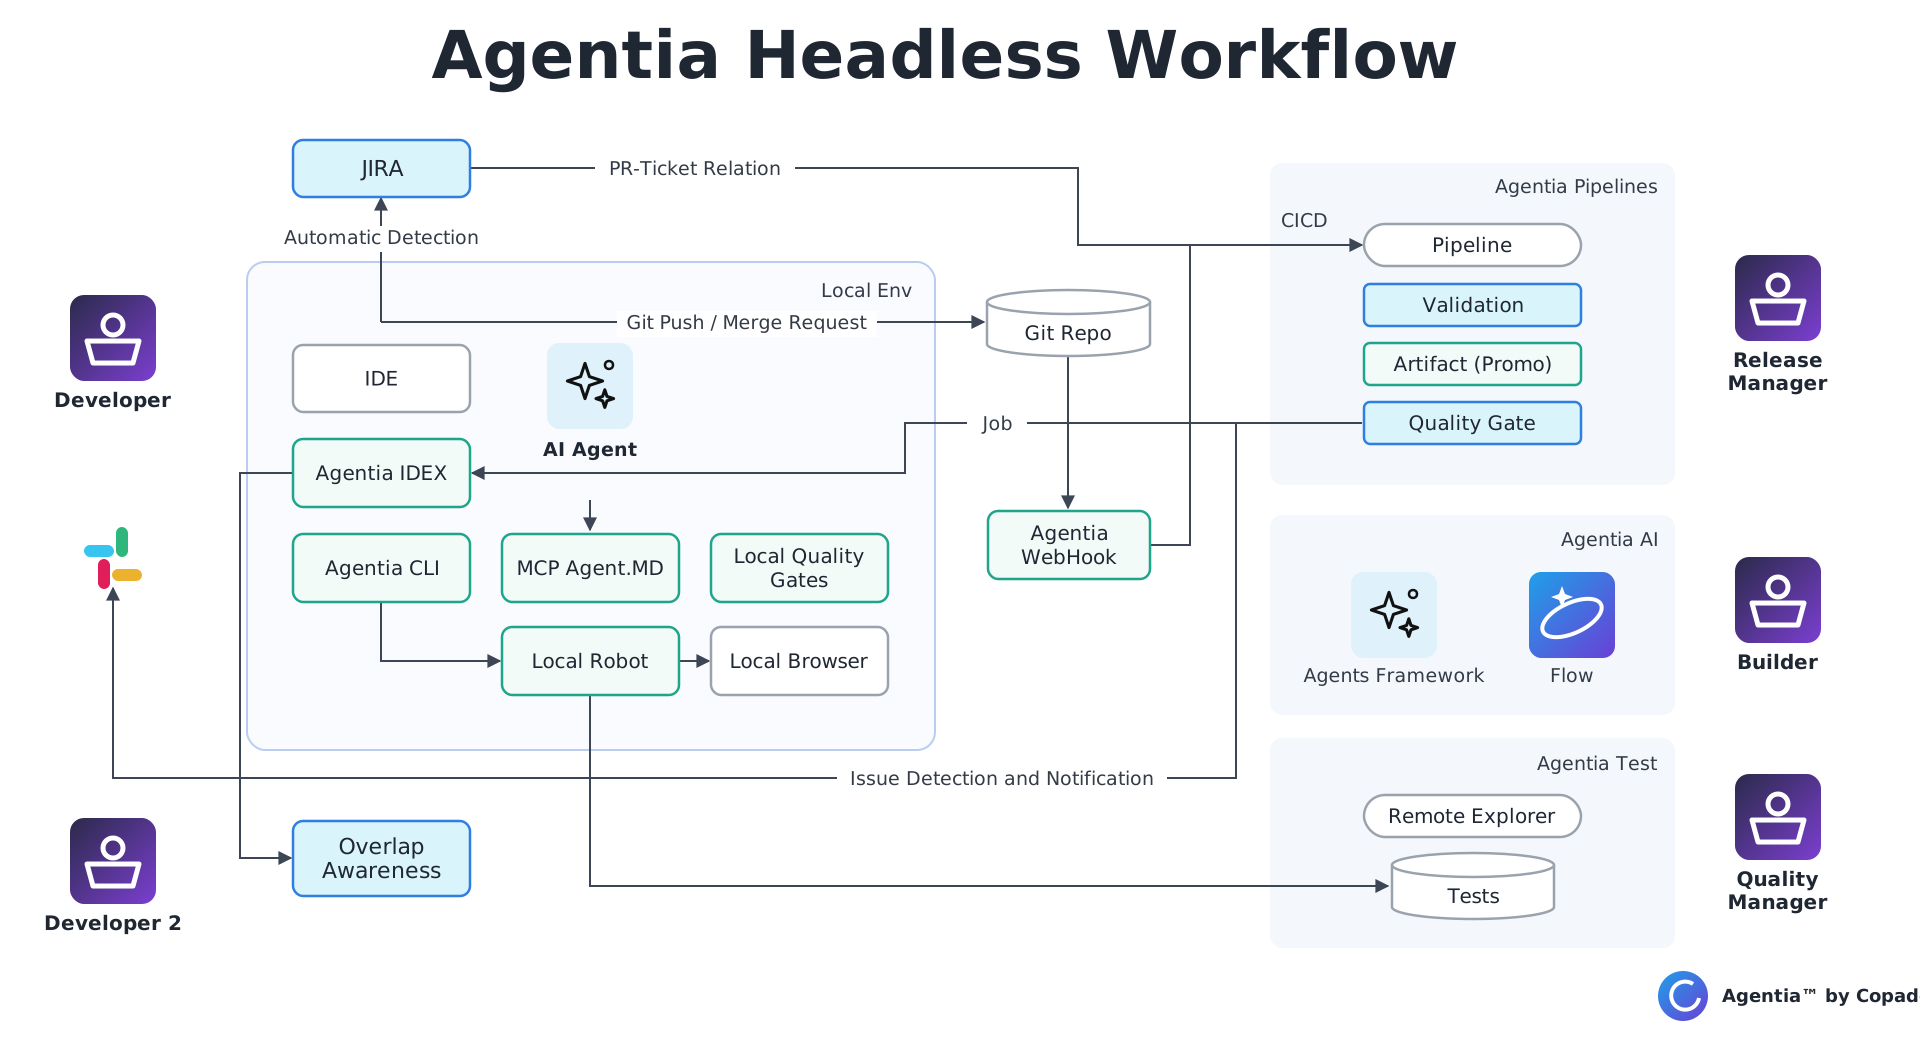
    Architecture & components

    1. CLI: agentia with the general, cicd, testing and ai namespaces.
    2. IDE extension: Agentia IDE for VS Code and Cursor.
    3. MCP: the local MCP server exposes Agentia operations as tools for your agent.
    4. Skills: project-local playbooks that teach your coding agent the Agentia workflow.
    5. Slack / Microsoft Teams app: coming soon.
    Agentia Headless architecture diagram
    Module 4

    Prerequisites

    1. VS Code or a similar IDE (Cursor).
    2. Node.js 18 or later.
    3. npm (installed with Node.js).
    4. Salesforce CLI.
    5. The knowledge listed above.
    6. A Copado CI/CD pipeline created, with your user configured.
    7. Copado Deployer v27.38+ and DX Extension v9.28+ installed in your org
    Module 5

    Install

    Install the CLI and the IDE extension.

    Agentia CLI

    Install the CLI globally with npm:

    $ npm install -g @copado/agentia-cli

    If you work with a private or custom npm registry, you might need to add --registry https://registry.npmjs.org as well as --@copado:registry=https://registry.npmjs.org.

    Agentia IDE

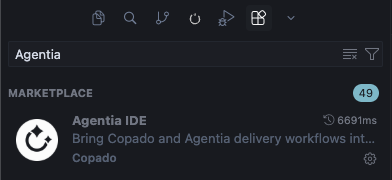
    Install the extension from the Extensions panel of your IDE: search for Agentia IDE (publisher: Copado) and select Install. Or open the extension page directly:

    Agentia IDE in the Extensions panel search results
    Module 6

    Set up

    Run a global, interactive setup from the CLI, set your project defaults, and follow the getting-started view in the IDE.

    CLI: agentia setup

    Run agentia setup once. It starts an interactive setup. Run it inside your project folder to get the project prompts as well.

    Always prompts for
    • Authentication: for CI/CD, AI and CRT.
    • MCP configuration: for Cursor.
    Inside a project, you can also opt in to
    • Gitignore: adjust .gitignore so the agentia-backend context is not tracked.
    • Local quality gates: create a local quality gates script you can reuse in local development workflows.
    • Agentia AI Skills: create the Skills and an AGENTS.md reference.
    $ agentia setup

    CLI: project defaults

    Set default values used when you manage user stories, such as your credential, environment and project. This is a regular command with flags, not interactive:

    $ agentia cicd project default set --project <project-id> --credential <credential-id> --environment <environment-id>

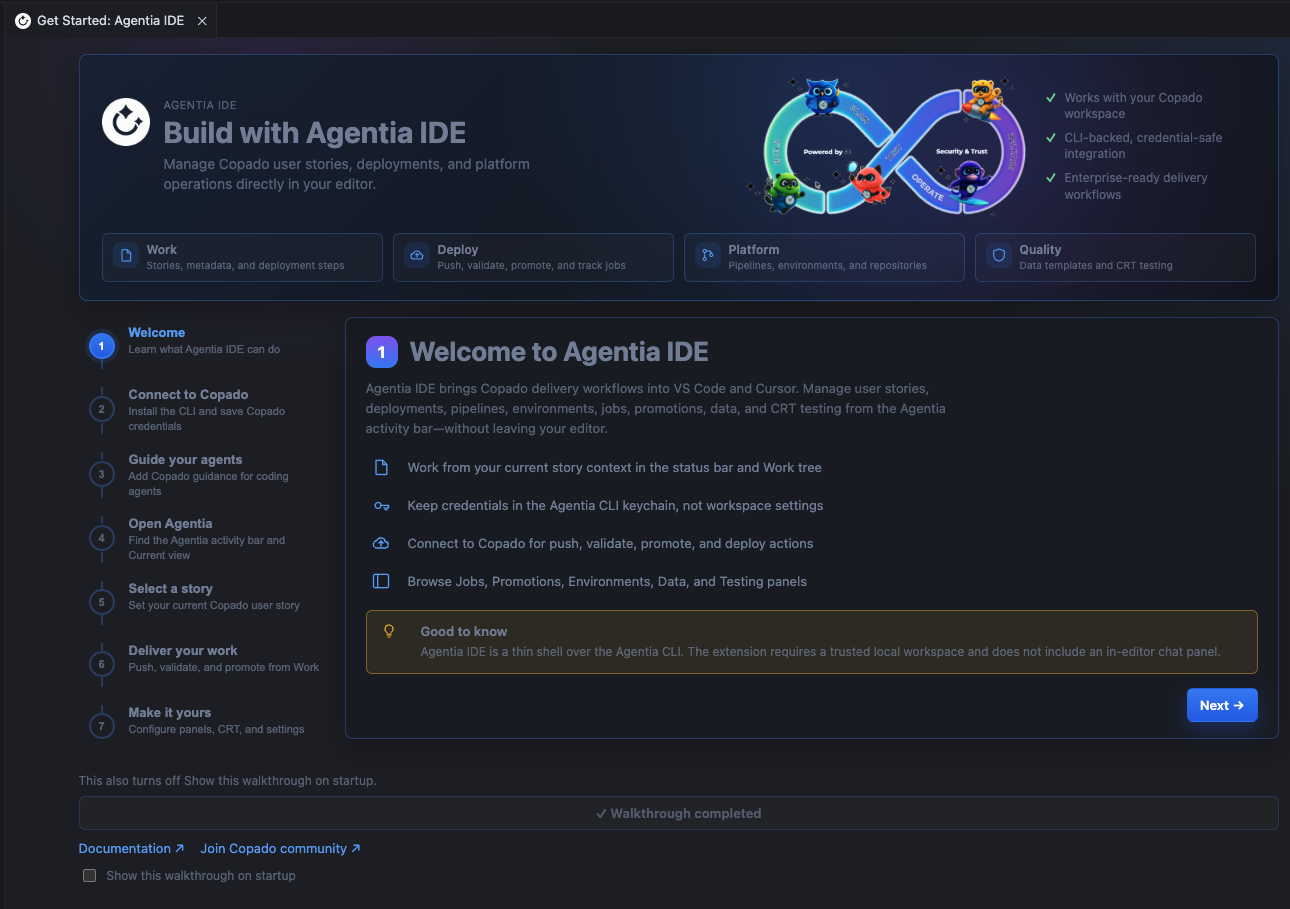
    IDE: getting started

    The first time you install Agentia IDE, a getting-started view guides you through a similar process: authentication, Skills, and what comes next.

    Agentia IDE getting-started view
    Module 7

    Developer use cases

    The fundamentals for developers. Start with 7a: the everyday flow from story to pipeline.

    7a

    Develop a metadata change

    The basic flow to build a Salesforce change, test it, commit it, and submit it to the pipeline so it can be promoted to the next environments.

    1. Work set (story based): select a story and set it as your current work; Agentia creates or checks out its feature branch.
    2. Typical SF development: build as usual and use Salesforce CLI to retrieve and deploy metadata to your development org.
    3. Local testing & quality gates: set up the repo-owned local gates (for example Salesforce Code Analyzer, Apex tests, Jest, Copado test records) and run them with agentia cicd work test --local. Local gates run on your machine; cloud quality gates run in the Copado pipeline.
    4. Git add/commit: stage and commit with plain git.
    5. Dependency analysis: detect missing dependencies in the target, from the CLI or the IDE.
    6. Work publish: detects metadata changes (including nested and permission changes) and registers the Copado commit.
    7. Work submit: validates, or deploys with --deploy / --done.
    8. Work environment-sync: if you're told your story is behind, bring the incoming changes into your branch.
    Video coming soon
    cicd
    22 min
    Developer

    The daily work-item loop: local and cloud paths

    Local and cloud work are separate delivery paths.

    Local: work set creates or checks out feature/<story-name>, then you stage and commit with plain git (git add -A, git commit -m "…"). work test --local runs project-owned quality gates. work push registers the Copado Commit (a plain git push does not) and takes --full-metadata and --permissions when those change-list corrections are needed. work submit validates.

    Cloud: cloud commit with metadata flags and --metadata-category SFDX for Salesforce metadata, then work status. Never continue a cloud commit with local work push or work submit.

    Promotion and deployment (work submit --done, or cloud promote --deploy) require explicit approval; work done is a compatibility alias.

    Local repository flow
    list → get → create/update → set → (implement & git commit) → test → publish → submit → status

    Flow

    1. Discover: agentia cicd work list --assigned-to-me --json, then agentia cicd work get <id-or-name> --json.
    2. Create or mutate the Story when needed: work create / work update.
    3. Activate: agentia cicd work set <id-or-name> --json. Requires a clean tracked tree. Fetch or create origin/feature/<story-name>.
    4. Implement with Salesforce CLI, VS Code, or an IDE. Stage and commit with git add / git commit. Do not use work commit.
    5. Run local gates: agentia cicd work test --json.
    6. Register: agentia cicd work publish --json. A plain git push does not register a Copado Commit. This auto-detects metadata changes such as permissions and nested metadata, pushes the changes to git and Copado, and updates the DevOrg branch.
    7. Validate: agentia cicd work submit --json. Add --deploy or --done to deploy to the next environment and update git.
    8. Sync: if there was a warning about user stories behind, run agentia cicd work environment-sync to merge the incoming changes to the current branch.
    9. Check pending jobs: agentia cicd work status [id-or-name] --json.
    Copado cloud flow
    list → get → create/update → (implement in the dev org) → cloud commit → status → cloud promote

    Flow

    1. Discover: agentia cicd work list --assigned-to-me --json, then agentia cicd work get <id-or-name> --json.
    2. Create or mutate the Story when needed: work create / work update.
    3. Implement directly in the dev org. There is no local repository and no git commit on this path.
    4. Commit and promote in Copado: agentia cicd cloud commit <id-or-name> --message "…" --metadata-name <name> --metadata-type <type> --metadata-category SFDX, follow the job with agentia cicd work status [id-or-name] --json, then promote only with explicit approval using agentia cicd cloud promote <id-or-name> --deploy. Never continue a cloud commit with the local work publish or work submit.
    cicd
    24 min
    Developer

    Metadata insight & dependencies

    See what changed before you commit, diff a component across orgs, and derive a complete deployment selection straight from your Git diff.

    $ agentia cicd metadata list --source Changed --pipeline-id <pipeline-id>
    $ agentia cicd metadata content get --metadata-type ApexClass --api-name AccountService
    $ agentia cicd metadata content compare --api-name AccountService --source-org-id <source-org-id> --target-org-id <target-org-id>
    $ agentia cicd metadata dependency list --from-changes --base-ref origin/main
    $ agentia cicd metadata refresh run --env <environment-id> --all
    7bTBD

    Environment sync (back-promotion)

    How to detect that your environment is out of sync with the pipeline and fix it with agentia cicd work environment-sync.

    Video coming soon
    7c

    Connect your dev environment / sandbox

    Add your environment and its credential to the Copado pipeline so Agentia can work against it.

    1. Create the environment record. A credential record is created automatically.
      agentia cicd environment create JohnDoeDEV
    2. Authenticate the credential. Agentia picks the best candidate, so you don't need to pass a credential id. A browser window opens so you can authenticate against that environment: complete the Salesforce OAuth flow, just like connecting an org with the Salesforce CLI.
      How Agentia picks the credential
      1. If the environment has only one credential, it uses that one.
      2. If there are several, it uses the one you own.
      3. If you own more than one, it uses the default.
      4. If needed, you can pass the credential directly with --credentialid <credential-id>.
      agentia cicd environment auth web login JohnDoeDEV
    3. Add the environment to the pipeline: create a pipeline connection with the pipeline, the source and destination environments, and the branch.
      agentia cicd pipeline connection create \
        --pipeline-id CorePipeline \
        --source-environment-id JohnDoeDEV \
        --destination-environment-id Integration \
        --branch jddev
    7d

    Job management & results

    Review deployment and promotion job status and results, get AI help with deployment failures, and resume failed jobs.

    1. Get the details of the promotion. It includes information about the latest job, for example JE-41169.
      agentia cicd promotion get P29465
    2. Get the details of the job.
      agentia cicd job get JE-41169
    3. If needed, get the job's logs.
      agentia cicd job log get JE-41169
    4. If there are promotion conflicts, list them, resolve them locally and submit a resolution.
      agentia cicd promotion conflict list --promotion P29443
      agentia cicd promotion conflict get <conflict-id> --promotion P29443
      agentia cicd promotion conflict resolve <conflict-id> \
        --promotion P29443 \
        --mode auto
    5. When ready, resume the promotion.
      agentia cicd promotion run P29443 --resume <resume-id>
    6. Or resume the job directly.
      agentia cicd job resume JE-41169
    7e

    Deployment Steps

    Attach Deployment Steps to a Copado user story to run extra work before or after its deployment. Before you start, authenticate for Copado CI/CD and select your story with agentia cicd work set <user-story-id> (or pass --user-story <id>).

    Guided flow (interactive)
    • Run agentia cicd work deployment-step create --interactive in a terminal and answer the prompts: name, step type, the type's settings and when it runs.
    • Best for creating a step by hand. It needs an interactive terminal and can't be combined with --json or other creation flags.
    Non-guided flow (flags, for scripts and agents)
    • Find the step type: agentia cicd work deployment-step types --json lists the standard and custom types you can use.
    • Create the step: agentia cicd work deployment-step create with a --name (up to 80 characters), the type (--type for standard, --custom-step-api-name for custom), the type's own flags (see below), and --sequence before or --sequence after the deployment.
    • Check and adjust: agentia cicd work deployment-step list --json shows the steps on the story; use update, reorder or delete to change them.
    What each step type needs
    • Manual Task: a human action. Requires --instructions; optionally --environment source|destination|both and an assignee (--assignee-id with --assignee-name).
    • Salesforce Flow: runs an invocable Flow. Requires --flow-name, the exact API name from agentia cicd work deployment-step salesforce-flows --json.
    • Function: runs a Copado Function. Requires --function-name.
    • Apex: runs anonymous Apex. Requires either --apex-script or --apex-script-file, not both.
    • Data Set / Data Template - Salesforce: deploys records. Requires --data-set-id or --data-template-id. A story that only deploys data can still be submitted.
    • Robotic Test: runs a Copado Robotic Testing test as a gate. Requires --crt-test-id; optionally --crt-run-on source|destination. Use the type label Robotic Test, not CRT Test.
    Optional settings for any step
    • --parameter name=value (repeatable): input values for Flow and Function steps.
    • --no-run-on-validation: skip the step during validation deployments.
    • --skip-back-promotion: skip the step during back-promotion.
    • --skip-condition and --queue-name: skip the step on a condition, or run it in a queue.
    Example flow: approve, load data, smoke test
    # Select the story you are working on
    agentia cicd work set <user-story-id>
    
    # See which step types are available
    agentia cicd work deployment-step types --json
    
    # Before the deployment: a manual approval
    agentia cicd work deployment-step create \
      --name "Approve production deployment" \
      --type "Manual Task" \
      --instructions "Review the validation results and approve the release" \
      --sequence before --json
    
    # After the deployment: load reference data
    agentia cicd work deployment-step create \
      --name "Deploy reference data" \
      --type "Data Template - Salesforce" \
      --data-template-id <data-template-id> \
      --sequence after --json
    
    # After the deployment: run a smoke test
    agentia cicd work deployment-step create \
      --name "Run deployment smoke test" \
      --type "Robotic Test" \
      --crt-test-id <robotic-test-id> \
      --crt-run-on destination \
      --sequence after --json
    
    # Check the steps on the story
    agentia cicd work deployment-step list --json
    Video coming soon
    cicd
    26 min
    7fRelease manager

    Promotions & conflict resolution

    When a Copado promotion stops because of merge conflicts, inspect and resolve each conflicting file from your terminal, then resume the original promotion so Copado keeps the same promotion branch, merge state and audit trail.

    Before you start
    • Where the promotion starts: from a story with agentia cicd cloud promote <story-id> --json, or from a promotion with agentia cicd promotion run <promotion-id> --operation merge --json. Deploy only when you mean to, with --deploy or --operation merge_and_deploy.
    • Access: the CLI is authenticated for Copado CI/CD and your user can manage conflicts for the promotion.
    • IDs: you have the Promotion ID and the Job Execution ID of the run that stopped. Keep that execution ID, because you resume it at the end.
    Resolve the conflicts
    • List: agentia cicd promotion conflict list --promotion <promotion-id> --json shows each conflict with its ID (attachmentId), user story, metadata type, name and status.
    • Inspect: agentia cicd promotion conflict get <conflict-id> --promotion <promotion-id> prints the raw content; add --output <file> to save it locally.
    • Resolve: choose automatic or manual mode for each file (see below) and repeat until every conflict is resolved. Resolving one file doesn't resolve the rest.
    • Verify: run conflict list again and check every conflict has the expected state.
    • Resume: agentia cicd promotion run <promotion-id> --resume <job-execution-id> --json continues the original run. It waits until it finishes; use --wait-timeout <seconds> or --no-wait to change that.
    Automatic or manual
    • Automatic: --mode auto asks Copado to resolve the conflict. It doesn't accept --file and won't work for every conflict; if it fails, switch to manual.
    • Manual: download the file with --output, keep or combine both sides, remove the <<<<<<<, ======= and >>>>>>> markers, then upload it with --mode manual --file <file>. The whole file is uploaded as the resolution, and files that still contain markers are rejected.
    • Undo: agentia cicd promotion conflict unresolve <conflict-id> --promotion <promotion-id> --json reverts a wrong resolution and restores the original conflicted content from the backup saved when you resolved it, so you can submit a corrected one.
    Keep in mind
    • Conflict ID: always use the attachmentId from conflict list, not the metadata name or user story ID.
    • No new runs: don't start a separate promotion run or recreate the promotion branch while the original run waits; that discards the merge state and makes resolutions stale.
    • Resume options: don't combine --resume with --operation, deployment-step selection, ignored metadata or branch recreation.
    • Your check: the CLI doesn't verify that manually merged Apex, XML or other metadata works, so validate it locally when you can.
    • If resume fails validation: list the conflicts, undo the wrong resolutions, submit corrected files and resume the same execution again.
    Example flow: resolve and resume
    # 1. See what is blocking the promotion
    agentia cicd promotion conflict list --promotion <promotion-id> --json
    
    # 2a. Let Copado resolve a simple conflict
    agentia cicd promotion conflict resolve <conflict-id> \
      --promotion <promotion-id> --mode auto --json
    
    # 2b. Resolve a conflict by hand (edit the file, remove the markers)
    agentia cicd promotion conflict get <conflict-id> \
      --promotion <promotion-id> --output ./MyClass.cls
    
    # Edit ./MyClass.cls, then upload it
    agentia cicd promotion conflict resolve <conflict-id> \
      --promotion <promotion-id> --mode manual --file ./MyClass.cls --json
    
    # 3. Check every conflict is resolved
    agentia cicd promotion conflict list --promotion <promotion-id> --json
    
    # 4. Continue the original run
    agentia cicd promotion run <promotion-id> --resume <job-execution-id> --json
    Video coming soon
    cicd
    22 min
    7gRelease manager

    Release Data Templates safely

    Prepare Salesforce data with Copado Release Data Templates, commit it to a user story, and check the generated Data Set. A data commit doesn't deploy records right away: they move with the story through the normal Copado promotion and deployment flow.

    Before you start
    • Access: the CLI is authenticated for Copado CI/CD, and your user can read the source org's schema and records and create data commits.
    • Setup: a source-org credential in Copado, the source and destination environments, and a user story for the data change.
    • IDs: keep the credential, environment, org, pipeline, user story and template IDs at hand. They are all different, so don't mix them up.
    • Online only: every agentia cicd data command talks to Copado; there's no offline mode.
    Prepare the template
    • Inspect the schema: agentia cicd data sobject fields <object> --credential-id <credential-id> --json and sobject relationships show fields and parent/child objects in the source org.
    • Create or pick a template: agentia cicd data template list --json (filter with --name, --main-object, --active), or template create with --credential-id, --template-name, --api-name, --main-object-api-name and --main-object-label (all five required).
    • Configure it: template get-detail downloads the editable template; edit it locally, then run template save-detail <template-id> --file <file> to push it back to Copado. This updates the template in Copado right away and replaces the whole template there, not just the parts you changed.
    • Legacy templates: run agentia cicd data template convert-old <template-id> --json before reading or editing an older template.
    Choose the records
    • Filters: agentia cicd data filter list|add|update|delete <template-id> manages named record filters. delete runs immediately, without asking.
    • Matching: agentia cicd data formula create <template-id> --name <name> --object-api-name <object> --fields <fields> defines how records match in another org (up to three fields; add --hash-formula for hashed matching).
    • Preview: agentia cicd data records search --credential-id <credential-id> --data-template-id <template-id> --json shows the selected records; add --changed-date-from <ISO date> for recent changes only. Check the count before committing.
    • Test a match: agentia cicd data records match --file match.json --json shows which destination record a source record maps to; null means no match.
    Commit and deploy
    • Create the commit: agentia cicd data commit create --file commit.json --json. The file needs the user story, template, source org, source and destination environment IDs, and filters on the main template.
    • Full commit ("fullTemplate": true): commits everything the template selects, with no records needed. Copado builds the Data Set in a background job and returns a jobExecution.id right away, without waiting.
    • Manual commit ("fullTemplate": false): commits only the records you picked from the preview. Add them under records or partialRecords (at least one is required). The result comes back straight away with recordsProcessed; there is no background job to follow.
    • Follow a full commit: it returns a jobExecution.id without waiting; check it with agentia cicd job get <job-execution-id> --json until it finishes.
    • Check the result: agentia cicd data commit list <user-story-id> --json, then data dataset-file list and dataset-file content to read the files.
    • Deploy: submit, promote and deploy the story as usual. If the story needs an explicit step, add a Data Set - Salesforce or Data Template - Salesforce deployment step (see 7e Deployment Steps).
    Keep templates in sync with metadata
    • Preview: agentia cicd data sync preview-updates --file preview.json --json lists the template fields affected by metadata changes, with their autoUpdate mode and needsAttention status.
    • Apply: agentia cicd data sync apply --file sync.json --json applies the approved entries. Some entries can fail while others succeed, so check synced, needsAttention and errorMessage on each one.
    Keep in mind
    • Real data: these commands work on real Copado and Salesforce data. Check every ID and target environment, and test on disposable records and stories.
    • No undo: template delete and filter delete run without confirmation; save a copy of the template first.
    • Sensitive files: Data Set files can contain customer or personal data. Don't put them in source control, shared logs or tickets.
    • JSON input: use either --file or --stdin, not both. Values in the file override the ones you pass as flags.
    • Preview is empty: check the credential points to the right org, the template ID and filters, your user's field access, and --changed-date-from.
    Example flow: from schema to Data Set
    # 1. Look at the source org's object
    agentia cicd data sobject fields Account --credential-id <credential-id> --json
    agentia cicd data sobject relationships Account --credential-id <credential-id> --json
    
    # 2. Create a template
    agentia cicd data template create --credential-id <credential-id> \
      --template-name "Accounts" --api-name Accounts \
      --main-object-api-name Account --main-object-label "Account" --json
    
    # 3. Edit the template and save it
    agentia cicd data template get-detail <template-id> --json | jq '.result' > template-detail.json
    agentia cicd data template save-detail <template-id> --file template-detail.json --json
    
    # 4. Preview the records it selects
    agentia cicd data records search --credential-id <credential-id> \
      --data-template-id <template-id> --json
    
    # 5. Commit the data to the story (commit.json)
    agentia cicd data commit create --file commit.json --json
    
    # 6. Full commit only: follow the generation job
    agentia cicd job get <job-execution-id> --json
    
    # 7. Check the Data Set and its files
    agentia cicd data commit list <user-story-id> --json
    agentia cicd data dataset-file list <user-story-data-commit-id> --json
    Video coming soon
    Module 8

    Agentic development

    Agentia Skills vs AGENTS.md, and how the local MCP server gives your agent native Agentia tools.

    Teach your coding agent the Agentia workflow

    Agentia Skills are portable, project-local Markdown playbooks that teach compatible coding agents how to operate Agentia CLI and its MCP tools safely. The generated skills cover Copado CI/CD workflows, Copado Robotic Testing workflows, and Copado AI agents and prompts. They provide command order, prerequisites, workflow boundaries, examples, and guardrails, so agents choose the right CLI or MCP operation, inspect before changing data, keep local and cloud delivery flows separate, and stop for approval before destructive actions.

    Agentia Skills
    Skill packs
    • CICD (--cicd): User Stories, promotions, jobs, pipelines, deployment steps, and release data.
    • Testing (--testing): Copado Robotic Testing projects, tests, jobs, builds, and live testing.
    • AI (--ai): Copado AI agents, prompts, workspaces, dialogues, and chat.

    Run create without selectors to create all three packs; add selectors to create only those packs. The interactive command asks where to install the skills.

    agentia setup skills create
    agentia setup skills create \
      --cicd \
      --testing
    Targets
    • agents (.agents/skills): portable, client-neutral skills.
    • cursor (.cursor/skills): Cursor project skills.
    • claude (.claude/skills): Claude-compatible project skills.

    Pass --target (repeatable) with --no-prompt for a non-interactive installation. Without --target in non-interactive or JSON mode, Agentia uses .agents/skills. When the same skill exists in several roots, load only one copy: prefer the client-specific root and use .agents/skills as the portable fallback.

    agentia setup skills create \
      --target cursor \
      --no-prompt
    agentia setup skills create \
      --target agents \
      --target cursor \
      --no-prompt
    Create and update

    Use create for the first installation and update to refresh after upgrading Agentia CLI; both accept the same pack and target options. create adds missing files but leaves existing managed files unchanged. update refreshes managed files and restores missing packaged files. Both preserve unrelated files and stop rather than overwrite an unmanaged file at a packaged path.

    agentia setup skills update \
      --target agents \
      --no-prompt
    agentia setup skills update \
      --ai \
      --target cursor \
      --no-prompt

    The CLI performs the operation. The local MCP server exposes supported Agentia operations as native tools. Skills tell the agent which operation to choose, in which order, what to inspect first, and which safety constraints apply. Installing a skill never authenticates the CLI, starts MCP, changes Copado data, or runs a deployment.

    Safety and limitations
    • Skill setup writes only local Markdown files and does not contact Copado gateways.
    • It does not read or modify keychain credentials or configure operational authentication.
    • There is no MCP setup-skills tool; use the CLI.
    • Generated skills are guidance, not permission or policy enforcement.
    • --force can overwrite custom content at packaged paths. Do not edit Agentia-managed skill files directly.
    • Inside a Git worktree, files are written at the repository root; outside Git, the current directory is used. Generated files are not committed automatically.
    AGENTS.md

    AGENTS.md gives AI coding agents project-level workflow and safety guidance. Agentia creates or updates a managed section in the project's root AGENTS.md and keeps the instructions your team wrote outside that section.

    Create or update AGENTS.md

    Run agentia setup and accept the prompt “Install or update Agentia skills and AGENTS.md workflow guidance?”. This installs or updates the skill packs, lets you choose one or more targets, and creates or refreshes the Agentia-managed section in AGENTS.md, preserving everything outside it. The focused agentia setup skills create and agentia setup skills update commands do not touch AGENTS.md.

    agentia setup
    What the managed section tells agents
    <!-- agentia:managed:start -->
    ...
    <!-- agentia:managed:end -->
    • Prefer registered Agentia MCP tools when available, and use CLI --json for machine-readable operations.
    • Configure authentication before operational commands, and never expose credentials or tokens.
    • Follow the Copado work-item lifecycle.
    • Load exactly one copy of each applicable skill, preferring client-specific skills over the portable .agents/skills fallback.
    • Treat project rules as higher priority than managed skill guidance.
    • Refresh managed skills with agentia setup skills update.
    Existing AGENTS.md files
    • Valid managed section: setup replaces only that section; content before and after it is kept.
    • No managed section: setup appends the managed section and keeps the existing content.
    • Invalid markers: if one of the pair is missing, duplicated, reversed or malformed, setup stops. Repair the markers and run it again.
    Add project-specific guidance

    Don't edit inside the managed markers: a future setup run can replace that content. Put team rules outside them. Project instructions take precedence over managed skill guidance.

    # Project instructions
    
    Use the team's approved branch naming convention.
    Run the project regression suite before requesting review.
    
    <!-- agentia:managed:start -->
    Agentia-managed content appears here.
    <!-- agentia:managed:end -->
    
    ## Additional project rules
    
    Document any repository-specific deployment approval requirements here.
    • Branching and review requirements.
    • Required test and quality-gate commands.
    • Project-specific Copado IDs or context that are safe to store.
    • Approval requirements for promotion or deployment.
    • Documentation and changelog expectations.
    • Restrictions on destructive operations.

    Never store credentials, API keys, access tokens, session values or other secrets in AGENTS.md.

    Update managed guidance

    Rerun agentia setup and accept the workflow guidance prompt to refresh the managed section from the template shipped with your installed CLI version. Content outside the markers is kept; review the file before committing it. To refresh only the skill files without changing AGENTS.md:

    agentia setup skills update \
      --target agents \
      --no-prompt
    Safety and limitations
    • AGENTS.md is guidance, not executable policy enforcement, and does not grant Copado permissions or configure credentials.
    • Only the full setup wizard manages the Agentia section; the focused skill commands do not.
    • Content inside the managed section can be replaced by a future setup run; content outside a valid section is preserved.
    • Malformed or duplicate markers block the update.
    • Setup does not commit generated files automatically.
    Read the Agent Skills guide in Docs →

    general
    16 min
    Platform engineer

    Wire the local MCP server into your IDE

    MCP gives the agent tools. Agentia Skills give it the operating playbook. Agentia includes a local MCP server that runs over standard input and output and exposes structured agentia_* tools for Copado CI/CD, Robotic Testing, Copado AI, data templates, promotions, jobs, environments and pipelines. Install both when the agent should execute Agentia workflows safely from the IDE, and keep domain boundaries in the tool chain: local work, cloud work, Robotic Testing and AI each have their own sequence. Promotion and deployment always need explicit user approval, so no work-done tool call is automatic.

    Configure Cursor

    Add the server to ~/.cursor/mcp.json (global, recommended) or <project>/.cursor/mcp.json (project only):

    {
      "mcpServers": {
        "agentia": {
          "type": "stdio",
          "command": "agentia",
          "args": ["mcp", "start"],
          "env": {
            "AGENTIA_PROJECT_ROOT": "${workspaceFolder}"
          }
        }
      }
    }

    Cursor expands ${workspaceFolder} to the active project, and Agentia loads that project's defaults, local authentication profile and .env values. If the file already lists other servers, add the agentia entry inside the existing mcpServers object. Then reload Cursor's MCP servers.

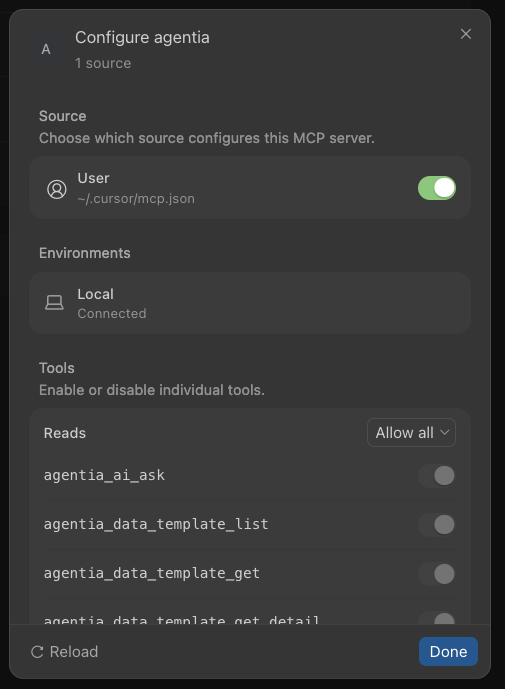
    Check that it is active: in Cursor, open Cursor Settings → Customize → MCPs, select Agentia and make sure its toggle is on, as in the screenshot below.

    Cursor Settings, MCPs: Agentia server with its toggle on
    Configure Claude Code

    Add the server to ~/.claude.json (global, recommended) or <project>/.mcp.json (project only):

    {
      "mcpServers": {
        "agentia": {
          "type": "stdio",
          "command": "agentia",
          "args": ["mcp", "start"],
          "env": {
            "AGENTIA_PROJECT_ROOT": "${PWD}"
          }
        }
      }
    }

    Claude Code expands ${PWD} to the current project directory. As with Cursor, add the entry inside an existing mcpServers object, then reload the MCP servers in Claude Code.

    How the server starts

    You don't need to start it yourself: once the configuration above is in place, your IDE (the MCP client) starts the Agentia server automatically when you open the project, and stops it when you close it. The agentia mcp start command in the configuration is what the IDE runs for you.

    **Manual start (optional): ** only for troubleshooting, run agentia mcp start in a terminal. It is a long-running stdio process that waits for an MCP client; it has no interactive interface.

    • It stops when the MCP client closes the input stream, when the process receives SIGINT or SIGTERM, or when the output pipe closes.
    • Closing the server cancels in-flight MCP requests and local quality-gate work.
    Module 9

    Known limitations

    1. SFP.
    2. Vlocity and other gaps.
    Module 10

    Testing / CRT training

    Operate Copado Robotic Testing (CRT) end-to-end from your terminal or IDE—from projects, robots, and Robot Framework job definitions to data-driven runs and interactive browser sessions.

    For CI scripts and coding agents, use --json for structured output (including auth ready: true and browser timeToExpire) and --yes to skip confirmation prompts. Interactive examples below retain human-readable output and confirmation.

    testing10 min10aQA engineer / Developer

    Authenticate & set up projects, permissions, and robots

    Configure dedicated CRT credentials, verify your profile, and provision the project and robot where your suites will run.

    Before you start
    • CRT authentication is separate from Copado CI/CD org credentials.
    • Run agentia auth get --crt and verify that your Personal Access Key (PAK), Domain, and Organization are all configured.
    Keep in mind
    • Never pass Personal Access Keys (PAKs) in URLs or commit them to source control.
    • In an interactive terminal, destructive commands (project delete, robot delete) prompt for confirmation before deleting.
    1. Configure & verify CRT auth

         agentia auth set --crt <pak> --crt-domain <domain> --crt-org <organization-id>   agentia auth get --crt
    2. Discover or create a Project & manage permissions

         agentia testing project list   agentia testing project create --name "Regression Suite" --description "Core Salesforce smoke tests"   agentia testing project permission list <project-id>   agentia testing project permission set <project-id> --user <user-id> --view --edit
    3. Discover or create a Robot (execution environment)

         agentia testing robot list --project <project-id>   agentia testing robot create --project <project-id> --name "Cloud Chrome Robot"
    testing15 min10bQA engineer / Developer

    Create jobs, manage `.robot` files, and schedule runs

    Create test definitions from local files or Git repositories, upload/download .robot scripts, and automate recurring runs with cron schedules.

    Uploaded file storage (job files)

    Upload .robot files or directories with --file / --dir when creating a job. List remote files with job files list, download them locally to edit keywords, and upload changes with --add, --replace <local>:<remote>, or --remove. --file tests/login.robot uploads as login.robot at root unless --base-path . or --remote-prefix is passed.

    Git-backed storage (job refs)

    Connect a job to a Git repository with --git-url and --git-branch. Inspect remote branches/tags on that Git-backed job with agentia testing job refs. Pass credentials safely via --git-password-stdin or --git-password-file.

    Example flow
    # 1. Create a file-backed job with a local Robot Framework script and video recording enabled$ agentia testing job create --project <project-id> --robot <robot-id> \  --name "Login smoke" --file tests/login.robot --show-video-params # 2. List, download, edit, and replace the uploaded .robot file$ agentia testing job files list <job-id> --project <project-id>$ agentia testing job files download <job-id> --project <project-id> \  --file login.robot --output-dir ./crt-files$ agentia testing job files upload <job-id> --project <project-id> \  --replace ./crt-files/login.robot:login.robot # 3. Or create a Git-backed job and list its remote branches and tags$ agentia testing job create --project <project-id> --robot <robot-id> \  --name "Git regression suite" --git-url https://github.com/acme/crt-tests.git --git-branch main$ agentia testing job refs <git-job-id> --project <project-id> # 4. Configure a weekday 06:00 schedule (standard 5-field cron) with timezone and recording policy$ agentia testing job schedule set <job-id> --project <project-id> \  --cron "0 6 * * 1-5" --timezone Europe/Helsinki --record failed$ agentia testing job schedule get <job-id> --project <project-id>
    testing15 min10cQA engineer / Developer

    Execute test runs, stream logs, and export artifacts

    Run CRT jobs under the unified testing job namespace, filter suites/tags, stream live execution output in your terminal, and inspect or abort runs with testing job runs.

    1. Streams live logs & waits by default: agentia testing job run streams real-time Robot Framework output and waits for the final build status. Use --no-wait to queue and return immediately, or --no-stream-logs for a compact progress spinner.
    2. Fine-grained controls: filter with --suite, --test, --include, --exclude, --param KEY=VALUE, --variable, --metadata, and --rerun-failed <build-id> / --rerun-failed-from-latest.
    3. Local reports & artifacts: save the completed output ZIP with --save-artifacts <file.zip> and extract the JUnit/xUnit report with --xunit <file.xml>. Missing parent folders are created automatically.
    4. Run inspection (job runs): list recent executions, filter by status, inspect build details, download logs, or abort an active run.
    Example flow
    # Run a job, stream live logs (15-minute timeout), and save xUnit + artifact ZIP locally$ agentia testing job run <job-id> --project <project-id> \  --include smoke --timeout 15 \  --save-artifacts ./artifacts/run.zip --xunit ./reports/junit.xml # List and search runs for a job$ agentia testing job runs list --project <project-id> --job <job-id>$ agentia testing job runs search --project <project-id> --job <job-id> --status failed # Inspect a specific build and download its logs$ agentia testing job runs get <build-id> --project <project-id> --job <job-id>$ agentia testing job runs logs <build-id> --project <project-id> --job <job-id> \  --output ./logs/run.log # Abort an in-flight (queued or executing) run$ agentia testing job runs abort <build-id> --project <project-id> --job <job-id>
    testing12 min10dQA engineer

    Variables, user parameters, and data-driven matrices

    Keep secrets out of shell history and process arguments, and run data-driven test matrices using CSV, TSV, JSON, or XLSX data tables.

    1. Secrets & Variables: create, list, update, and delete project/robot/job-scoped variables with agentia testing variable --project <id> and account-scoped parameters with agentia testing user-parameter. Pipe sensitive values with --value-stdin or --value-file to keep secrets out of shell history and process arguments. Sensitive terminal output is masked as [REDACTED].
    2. Data Tables: import and export CSV, TSV, JSON, or XLSX datasets with testing data-table create, list, get, update, export, and delete. Names allow alphanumeric characters, dots, dashes, and underscores, but no spaces.
    3. Batch execution: pass repeatable --datatable TABLE_ID:1,2-4 to testing job run. Dataset row numbers and ranges are 1-based.
    Example flow
    # Store a sensitive project variable safely via stdin$ printf '%s' "$TEST_USER_PASSWORD" | agentia testing variable create \  --project <project-id> --key SF_PASSWORD --value-stdin --sensitive # Create a data table from a CSV file (displays an upload preview first) and export rows 1-3 as XLSX$ agentia testing data-table create --project <project-id> \  --name Checkout_Matrix --file ./data/checkout.csv$ agentia testing data-table export <table-id> --project <project-id> \  --datasets 1-3 --output ./data/checkout.xlsx # Trigger a data-driven batch run for rows 1-3$ agentia testing job run <job-id> --project <project-id> \  --datatable <table-id>:1-3
    testing20 min10eQA engineer / Developer

    Interactive browser testing & live recorder

    Launch a live cloud browser session (QWeb, QForce for Salesforce Lightning, or QMobile) to watch tests interactively, record clicks, run keywords on the fly, inspect the page, and export verified Robot Framework steps.

    1. 1

      Start & open viewer

      Start with testing browser start --library QWeb|QForce|QMobile, then open the live viewer with testing browser view. Use --no-open to print the URL only.

    2. 2

      Record interactions

      In a separate terminal, run testing browser recorder --output ./tests/captured.robot. Viewer clicks and CLI-executed keywords are recorded chronologically. Press Ctrl-C when done.

    3. 3

      Execute & inspect

      Execute Robot Framework lines with testing browser execute --line "Keyword arg1 arg2" (4+ spaces between arguments). Use inspect to detect UI elements and screenshot for annotated screenshots with teal detection boxes.

    4. 4

      Review history & stop

      Review keywords with testing browser history, upload the captured .robot file with testing job files upload, and close the session with testing browser stop.

    Keep in mind
    • 10-minute idle timeout: browser sessions close after 600 seconds without an executed keyword. Inspect the session with testing browser status --project <project-id>.
    • Locator priority: prefer readable text locators (ClickText, TypeText, VerifyText with anchor=) over ClickItem attributes. Use XPath (ClickElement) only as a last resort.
    Example flow
    # 1. Start an interactive session (use --library QForce for Salesforce Lightning)$ agentia testing browser start <job-id> --project <project-id> --library QForce # 2. Open the live cloud browser session in your default browser$ agentia testing browser view --project <project-id> # 3. In a second terminal: record browser clicks and executed keywords (press Ctrl-C to stop)$ agentia testing browser recorder --project <project-id> --output ./tests/captured.robot # 4. Run keywords interactively from the terminal (4+ spaces between arguments)$ agentia testing browser execute --project <project-id> \  --line "GoTo    https://login.salesforce.com" \  --line "VerifyText    Username" # 5. Inspect detected UI elements and save an annotated detection screenshot$ agentia testing browser inspect --project <project-id>$ agentia testing browser screenshot --project <project-id> --output ./tmp/viewport.png # 6. Review session keyword history and upload your captured script to the job$ agentia testing browser history <job-id> --project <project-id> --lines-only$ agentia testing job files upload <job-id> --project <project-id> --add ./tests/captured.robot # 7. Stop the interactive browser session$ agentia testing browser stop --project <project-id>

    Module 11

    Copado AI basic training

    ai
    18 min
    AI-assisted delivery

    Ask the Copado AI agents from the terminal

    Let the skill choose the mode: ask is the automation and agent-to-agent path with exactly one lifecycle selector (plan, build, test, release, operate, knowledge), while chat is TTY-only for a human terminal. Context flags such as workspace, dialogue, User Story, Salesforce org, and component enrich a clear prompt; they do not replace one. MCP supports buffered single-turn ask, not interactive chat.

    $ agentia ai agent ask --agent plan -p "Break this requirement into implementation steps" --json
    $ agentia ai agent ask \
    -p "Summarize Copado guidance for Data Template synchronization" --no-stream --json
    $ agentia ai agent chat --agent build --workspace <workspace-id>
    $ agentia ai quota get --json
    Module 12

    How to extend the Agentia CLI

    The Agentia CLI is extensible: any developer can build a plugin on top of it and add new capabilities to the tool.

    1. Create a plugin: npm init @copado/agentia-plugin my-plugin scaffolds an oclif plugin and installs its dependencies.
    2. Review the scaffold: each command lives in src/commands/<topic>/<command>.ts; add new commands by creating more files in the same shape.
    3. Build and link: cd my-plugin, npm run build, then agentia plugins link ..
    4. Run it: agentia <topic> <command>. Re-run npm run build after every change.
    5. Supported today: new commands, oclif flags and args, story and health checks, link or install like any oclif plugin.
    6. Not supported yet: importing the CLI, wrapping existing commands, registering MCP tools.

    How-to & quick guides

    Full walkthroughs with every command, prerequisite, and expected result, end to end.

    Video demos

    Coming soon

    Short screen recordings of the same workflows, recorded in the terminal and the IDE. More demos are on the way.

    Demo video coming soon

    Modify and push metadata changes to the pipeline

    Demo video coming soon

    Ship a CPQ metadata change all the way to Integration

    Demo video coming soon

    Run a Copado Robotic Testing job, read the logs, and fix the script

    Looking for the full command surface?

    Browse every general, cicd, testing and ai command in the CLI reference.

    Open the CLI reference →

    Need a custom workshop? Talk to enablement →